
Help Centre
How to configure a Static package
Bundling products is a proven way to increase average order value and move inventory. While some scenarios require customer choice (like a Flexible package), others work best when the content is perfectly curated and fixed.
The Static package is the ideal solution for selling specific sets where you want to control exactly what the customer receives. Think of holiday gift boxes, "starter kits," or a specific outfit where the shirt and pants are sold together as a single unit. The customer buys the package "as is," without needing to make complex decisions about the contents.
Why use a Static package?
- Simplicity: It creates a "one-click" purchase experience for the customer.
- Curated experience: You ensure the customer gets the exact combination of items (e.g., the right coffee with the matching mug) intended for the best experience.
- Inventory management: It allows you to bundle specific variants (like a specific color or size) to manage stock levels effectively.
Step 1: Create the Package and Basic Settings
The first step is to create the container for your products.
- Click "+ Create new product" in the top right corner of the product list.
- Select Static package from the list of product types.

Once created, you need to configure the basic data across the different tabs to make the "virtual" product ready for the store.
- In the Settings tab. Assign a name and product number, and set the product state to "Ready for sale".
- In the Variants tab. Untick the option to use attributes to automatically create a single "Default variant", since packages usually function as a single unit.
- In the Enrichment tab. Add a description, metadata, and product properties, and upload a media image that showcases the entire set.
- In the Categories tab. Assign the product to a page so customers can find it easily alongside your standard products.
- In the Prices tab. Set the sales price manually. Since the contents are fixed, you can easily calculate a price based on the total value of the items, usually offering a discount to create a purchase incentive. Reminder: Ensure your calculation accounts for the specific quantities of each item you will include.
Step 2: Define the package contents
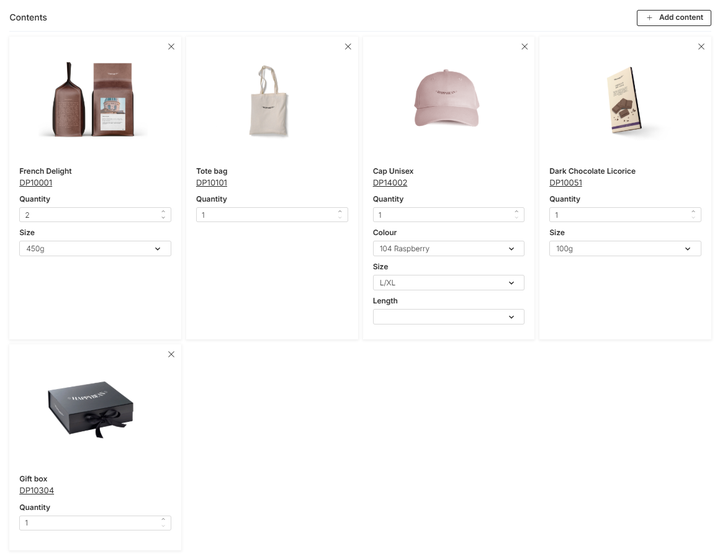
This is where the Static package differs from other types. Navigate to the Package contents tab. Unlike Flexible packages, there are no "Groups" or choices here. You are simply defining the exact bill of materials for this bundle.
- Click "+ Add content". Search for and select the products you want to include in the bundle.
- For every product you add, you must define exactly which version the customer gets. First, set the Quantity to determine how many units of this item are included. Then, select the Variant to lock down specific attributes. Example: If you were building a "Christmas Evening Set", you could add a ceramic mug, set the quantity to 1, and select a variant such as "Christmas Red". Next, you might add a scented candle, set the quantity to 1, and choose a variant like "Ginger & Orange". Finally, you could include a box of chocolates with a quantity of 1, selecting the standard option if the product has no attributes.
The customer will see the package as a single item, but behind the scenes, the system will deduct stock for the specific variants you selected here.
Step 3: Publish the package
Once the configuration is complete, navigate to the Publish tab. Review your data and toggle the status to "Published" to make the package live in your webstore.
See it in action
Want to see how a Static package works for the visitor in the webstore? Visit our demo store to see how fixed bundles are presented as a single unit. View Demo: Static package example