
Help Centre
How to configure a Mix and Match package
Sometimes you want to present a collection of products together, like a complete outfit or a room set, but you want the customer to retain full flexibility over each individual item.
The Mix and Match package is similar to a Flexible package, but with a key difference in how the purchase is handled. It allows you to group products together on a single page, letting the customer choose their preferred size or color for each item. It is a powerful way to showcase complementary products together, inspiring visitors with a curated look that encourages them to purchase multiple items.
However, unlike a standard package that is sold as one unit, the Mix and Match package functions as a collection. There is no single button to "buy all"; instead, each product in the package has its own Add to cart button. This adds the selected item to the shopping cart as a separate line item, giving the customer complete freedom to buy the whole look or just the pieces they love.
Why use a Mix and Match package?
- Inspiration & merchandising: It effectively showcases how products look together (e.g., a "Summer Look" or "Barista Set"), attracting customers to items they might not have found individually.
- "Shop the look": It is the ideal solution for selling outfits where the customer needs to pick the right size and color for each piece individually.
- Guided shopping: You can set a "Default choice" (e.g., the exact colors worn by the model in the hero image) to guide the customer, while still giving them the freedom to change attributes before clicking add to cart.
Step 1: Create the Package and basic settings
The first step is to create the container for your collection.
- Click "+ Create new product" in the top right corner of the product list.
- Select Mix and match from the list of product types.

Once created, you need to configure the basic data across the different tabs to make the "virtual" product ready for the store.
- In the Settings tab. Assign a name and product number, and set the product state to "Ready for sale".
- In the Variants tab. Untick the option to use attributes to automatically create a single "Default variant", as this package acts as a container.
- In the Enrichment tab. Upload a media image that showcases the full collection (e.g., a model wearing a full outfit or a room set) and add a description.
- In the Categories tab. Assign the package to a page so customers can find it easily.
- In the Prices tab. Set the price manually. This is typically the sum of the items, or a discounted "bundle price" to encourage purchasing the full set.
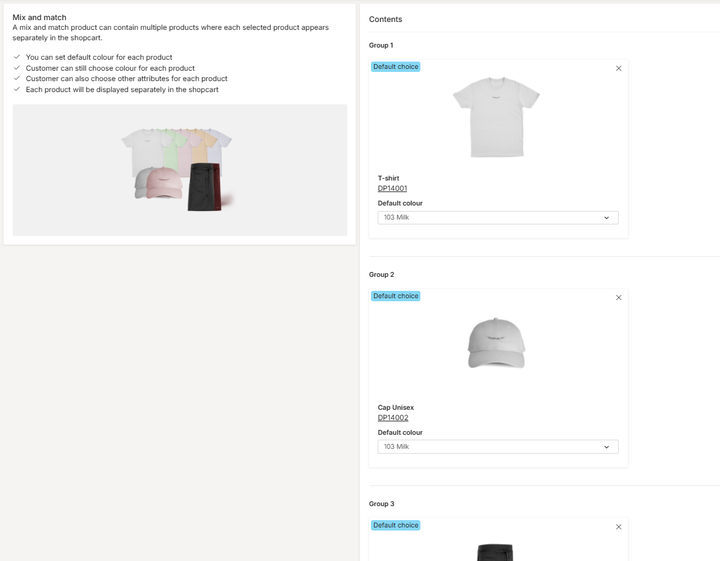
Step 2: Define the contents
Navigate to the Package contents tab to build your collection. The structure here is unique: Adding a product automatically places it in its own distinct Group. Each group holds only one product type, but allows for variant selection.
- Click "+ Add content" and select the product you want to include.
- The product is added to "Group 1". You must select a Default colour. This is the pre-selected option the customer will see when they land on the page, matching your main package image.
- Repeat the process for the next item. It will automatically form "Group 2". Set its default color.
Step 3: Publish the package
Once the configuration is complete, navigate to the Publish tab. Review your data and toggle the status to "Published" to make the collection live in your webstore.
Note: If this is the first time you are configuring this product type, it requires additional setup in the CMS. You must ensure the Shop the look component is added to the Product Detail Page layout to correctly prepare and present the selection choices to the customer in the webstore.
See it in action
Want to see how a Mix and Match package works for the visitor in the webstore? Visit our demo store to see how customers can personalize an entire outfit from a single page. View Demo: Barista Outfit Mix & Match